
Invisible dog fences go by many names, including:
- Electric dog fences
- In-ground dog fences
- Underground dog fences
Whatever you choose to call these containment systems, they consist of the following components:
- Transmitter box
- Boundary wire
- Electronic collar
You install the transmitter box in your house or garage, or in an outbuilding. The transmitter plugs into a regular socket.
You will then connect the boundary wire to the transmitter box.
The wire is installed around the boundary of your property, typically buried under the ground, but occasionally stapled above ground. The invisible wire will carry a harmless low-level radio signal. The wire must start and end at your transmitter box so that it creates a continuous circuit.
Your dog will wear a computerized collar that comes bundled with the in-ground fence. This collar will emit an audible beep followed by a mild static stimulation if your pup gets too close to the designated area.
When you install the fence, you will use temporary training flags at first. These act as visual markers to streamline training your dog to appreciate the avoidance area and to respect the boundaries you have created.
Once you have trained Rover, you can leave him unattended in the yard without any safety concerns, even if he has occasionally pulled an escape act in the past.
Can You Keep the In-Ground Transmitter Above Ground?

Yes. It is the wire in an electric fence that you bury under the ground. The transmitter, on the other hand, remains above ground.
The most common locations for the transmitter are:
- Inside the home
- Inside the garage
- In an outbuilding
You can typically make adjustments on the transmitter, changing the distance your dog is permitted to get to the hidden wires before his receiver collar provides him with feedback. When creating boundaries, you should ensure that your dog has plenty of room to roam and play before getting buzzed.
The method of correction varies depending on the type of electric fence. The most common feedbacks include:
- Varying levels of mild static shock
- Vibration
- Audible beep
Many in-ground fences offer the choice of all three types of feedback, giving you much more leeway when training, and catering for the needs of most dogs.
Now you know where to install the transmitter above the ground, how can you install the fence?
How to Install an In-Ground Dog Fence the Easy Way
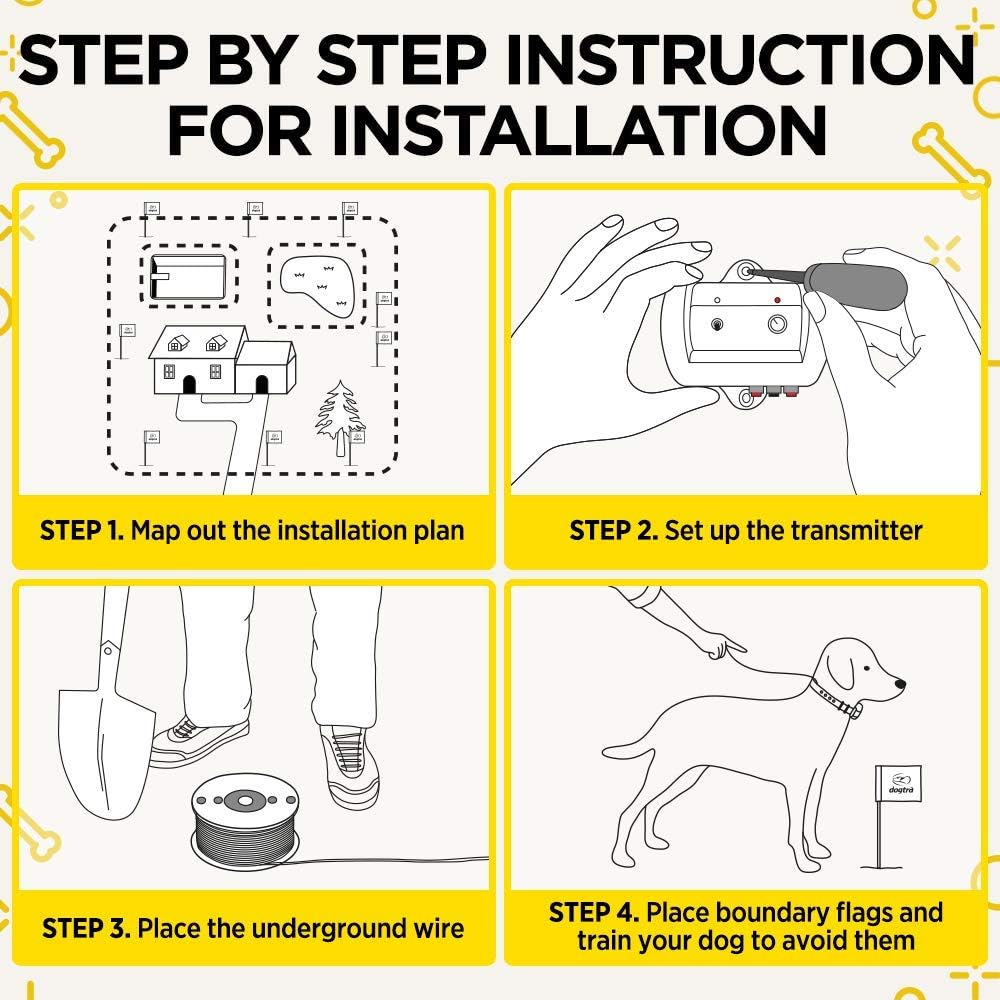
Here’s how to install your electric dog fence:
- Establish the boundary area: First, sketch a map of your whole property on some grid paper. Mark the safe zone that you wish to create for your dog. Block off any areas like your flower beds, garden, or pool. When thinking about placement, avoid running any boundary wires near phone wires, electrical wires, or TV wires. You should not run wires along chain link fences, either. All of these can disrupt signaling. You now need to measure the perimeter of the fencing using a long tape measure. Most in-ground fences will provide you with enough wire to cover anywhere from 1/3 to 1/2-acre of yard. If you have a larger area to demarcate, you’ll need to purchase extra wire.
- Mount the transmitter: Now it’s time to mount your transmitter. To reiterate, although this is an in-ground fence, the transmitter remains above ground. Houses, garages, and outbuildings are popular locations for the transmitter of these systems. You need somewhere that the transmitter will not get wet. It also needs mounting and plugging into an electrical outlet. Don’t use a shed, a barn, or any building that is not guaranteed watertight. This could present both an electric shock risk and a fire risk. Don’t mount the transmitter too close to an electrical box or large appliances. This can trigger electrical interference. Use a surge protector to safeguard your system against power surges or lightning strikes. Pay close attention to the instructions concerning how you should ground your transmitter.
- Lay out the wire, hook up to the transmitter, test: You will not yet need to bury any wires. Lay out the wire on the ground according to your plan. You need it to form one continuous loop that starts and finishes at the transmitter. Aim for gradual turns rather than right angles. If the corners are squared-off, this can confuse the transmitter. When the wires are laid out, you can now connect them to the transmitter. Test that the system is working with the receiver collar by approaching the boundary and waiting for the alert.
- Connecting wires: If you are forced into splicing in some extra wire, strip the ends of the wires you plan to hook up. Insert both ends into a connector and then twist. When the wires are properly connected and functional – you can use the collar to test this – you are ready to apply some caulk around the connector. Once the silicone caulk dries, use some electrical tape to wrap the wire ready for burying.
- Burying the wires: Make sure that you know the location of underground utilities and power lines on your property. Call your county or city if you are unsure. Stick the training flags in the ground at regular intervals. This will be a vital part of training your hound – more on this below. Dig a narrow trench all around the containment area. Insert the wire. This should be roughly 3 inches underground. Digging too deep is counterproductive. The signal will struggle to communicate with the collar. Although it is possible to leave the wire above ground – typically stapled to a fence – this is inadvisable. Someone could easily trip over the exposed wire. It is also liable to be damaged by a lawnmower. Over time, the wire will become weather-beaten, and performance will be eroded. You’re not ready to test the system one last time using the collar before fitting your dog with the collar and beginning his training program.
Train Your Dog
As we have mentioned, it is imperative that you train your dog once you have installed the electric fence.
After up to two weeks of daily training, ideally using training flags at first, you should find that most dogs are capable of respecting the boundaries you create. You don’t need to train your dog more than twice a day for perhaps 15 minutes. Consistently repeating this routine for a few days to a few weeks should be enough to get even the most stubborn dog in line.
Conclusion
We trust that today’s brief guide to transmitter placement has given you a clearer understanding of how in-ground dog fences work.
As long as you have some simple tools and basic DIY skills, you can install this type of invisible fence cheaply and easily. With minimal training, you should soon find that your furball is able to stay within the boundaries you have demarcated for him in your yard.
Before you leave, we suggest bookmarking GO Boxer Rescue and we hope to see you very soon!